
Introduction
Picture this: you're craving something sweet, chocolatey, and completely irresistible, but you've only got a few minutes and barely any ingredients on hand. That's exactly when these 4-Ingredient Oreo Balls become your culinary superhero! This recipe is pure magic – transforming simple pantry staples into bite-sized spheres of heaven that taste like they came from an upscale bakery.
What makes these Oreo balls so special? They require zero baking skills, no fancy equipment, and definitely no complicated techniques. I discovered this recipe during a particularly chaotic week when unexpected guests were arriving, and I needed dessert fast. The result? Everyone begged for the recipe, and I've been making them ever since.
These creamy, chocolatey treats deliver that perfect balance of smooth cream cheese richness and crunchy Oreo satisfaction, all wrapped in a glossy chocolate coating. Whether you're planning a party, need a last-minute dessert, or simply want to satisfy your sweet tooth, these 4-ingredient Oreo balls are about to become your new obsession.
Ingredients List
The beauty of this recipe lies in its simplicity. With just four basic ingredients, you'll create dessert magic that rivals any complex confection:
Base Ingredients:
- 1 package (14.3 oz) Oreo cookies (original flavor works best)
- 8 oz cream cheese, softened to room temperature
- 16 oz white chocolate melting wafers or chocolate chips
- 2 tablespoons coconut oil or vegetable shortening
Smart Substitutions:
For those with dietary restrictions, consider these swaps: dairy-free cream cheese works beautifully for lactose-intolerant friends, while gluten-free chocolate sandwich cookies can replace traditional Oreos. Dark chocolate melting wafers create a more sophisticated flavor profile, and you can substitute the coconut oil with butter for a richer coating.
The key to success is using room-temperature cream cheese – this ensures smooth mixing and prevents lumpy texture that can ruin the final result.
Timing
This recipe is wonderfully forgiving and fits into even the busiest schedules:
Preparation Time: 20 minutes
Chilling Time: 2 hours
Coating Time: 15 minutes
Total Time: 2 hours 35 minutes
Time-Saving Tips:
Speed up the process by placing the formed balls in the freezer for 30 minutes instead of refrigerating for 2 hours. While they chill, clean your workspace and prepare your chocolate coating station. The actual hands-on time is minimal, making this perfect for multitasking – start a load of laundry or prep dinner while they set.
For make-ahead convenience, form the balls up to three days in advance and store them covered in the refrigerator until ready to coat and serve.
How to Make It
1. Prepare Your Oreo Base
Start by crushing the entire package of Oreos in a food processor until you achieve fine, even crumbs with no large chunks remaining. This should take about 1-2 minutes of pulsing. If you don't have a food processor, place the cookies in a sealed plastic bag and crush them with a rolling pin – it takes a bit more effort but works perfectly.
Transfer the crumbs to a large mixing bowl and add the softened cream cheese. Mix thoroughly until the mixture holds together when squeezed. The consistency should be similar to cookie dough, moldable but not too wet.
2. Shape the Balls
Using clean hands or a small cookie scoop, roll the mixture into uniform balls about 1 inch in diameter. Place them on a parchment-lined baking sheet as you work. Don't worry about perfection – slight irregularities add homemade charm.
Once all balls are formed, refrigerate for at least 2 hours or freeze for 30 minutes until they're firm enough to handle without falling apart.
3. Prepare the Chocolate Coating
In a microwave-safe bowl, combine the white chocolate wafers and coconut oil. Microwave in 30-second intervals, stirring between each interval, until completely smooth. This gradual melting prevents the chocolate from seizing and ensures a glossy finish.
The coconut oil helps thin the chocolate slightly, making it easier to coat the balls evenly and creating that professional-looking shell.
4. Coat and Finish
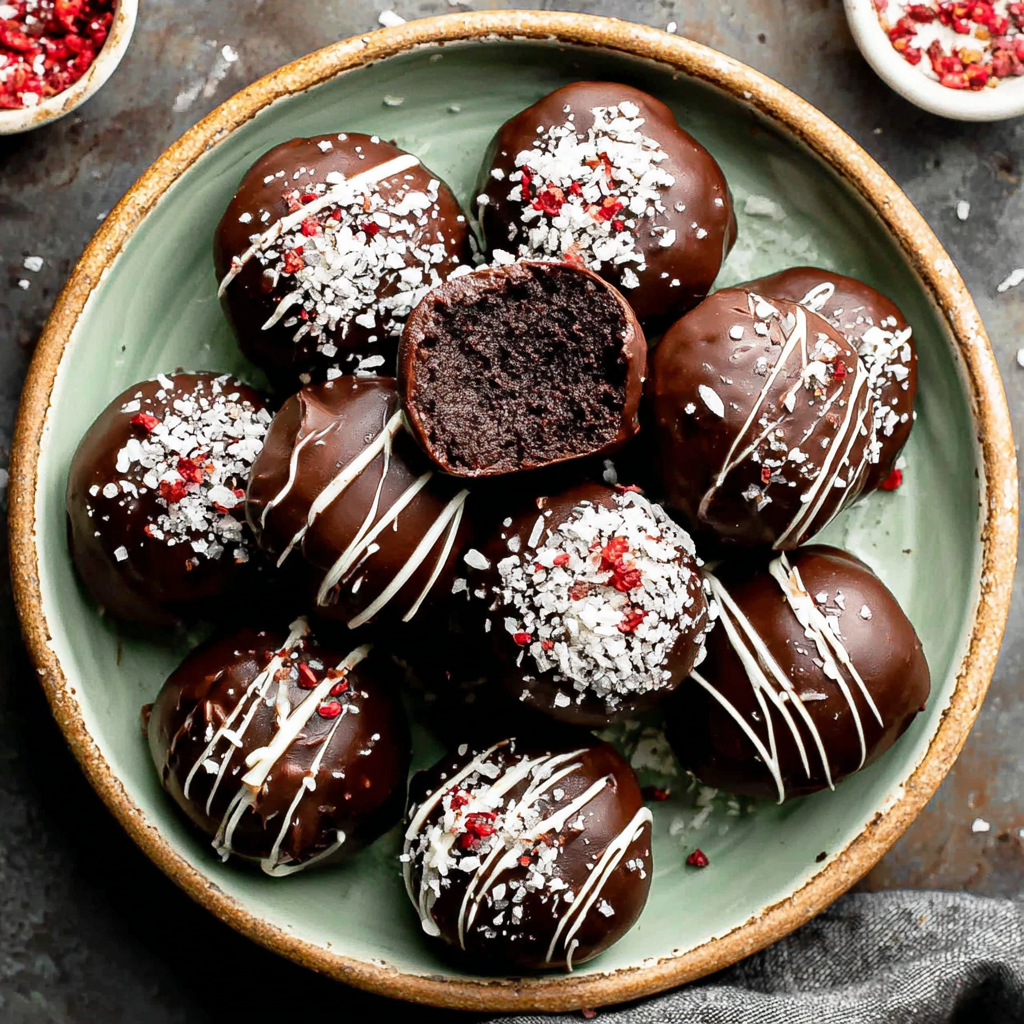
Working quickly, dip each chilled ball into the melted chocolate using a fork or dipping tool. Gently tap off excess chocolate and place on a clean parchment-lined baking sheet. If desired, drizzle with contrasting chocolate or sprinkle with crushed Oreo crumbs while the coating is still wet.
Refrigerate the coated balls for 15 minutes to set the chocolate completely before serving.
Nutritional Information
Each Oreo ball contains approximately 180-200 calories, making them a reasonable indulgence when enjoyed in moderation. These treats provide some calcium from the cream cheese and a small amount of protein, though they're primarily an energy-dense dessert.
The combination of chocolate and cream cheese delivers satisfaction in small portions, which helps with portion control. Unlike many commercial candies, you know exactly what ingredients went into these homemade treats, giving you better control over quality and freshness.
Keep in mind that nutritional values may vary based on specific brands used and final ball size. For lighter versions, consider the modifications suggested in the next section.
Healthier Alternatives for the Recipe
Transform these indulgent treats into lighter options without sacrificing too much flavor:
Lower Calorie Version: Substitute reduced-fat cream cheese and use sugar-free chocolate wafers. The texture remains creamy while cutting approximately 30% of the calories per ball.
Gluten-Free Adaptation: Replace Oreos with gluten-free chocolate sandwich cookies. Many brands offer nearly identical taste and texture to traditional versions.
Vegan Option: Use dairy-free cream cheese and ensure your chocolate coating is vegan-certified. Cashew-based cream cheeses work particularly well in this application.
Portion Control: Make mini balls using about half the mixture per ball. You'll get more pieces with built-in portion control, perfect for parties or when you want just a small sweet bite.
Serving Suggestions
These versatile 4-ingredient Oreo balls shine in numerous settings. Arrange them on a tiered serving tray for elegant presentations, or pack them in decorative boxes as hostess gifts. They pair beautifully with coffee, making them ideal for brunch spreads or afternoon gatherings.
For special occasions, customize the appearance with different chocolate coatings – try milk chocolate for kids' parties or dark chocolate for sophisticated adult gatherings. During holidays, roll them in colored sprinkles or drizzle with seasonal colors.
Serve 2-3 balls per person as a sweet finish to dinner parties, or include them in dessert buffets alongside complementary treats like chocolate-covered strawberries or mini cheesecakes.
Common Mistakes to Avoid
The most frequent error is using cold cream cheese, which creates lumpy, difficult-to-mix results. Always allow cream cheese to reach room temperature naturally – this takes about an hour but makes all the difference.
Avoid over-processing the Oreos into powder. You want fine crumbs, but some texture adds interest to the final product. Similarly, don't skip the chilling step, as warm balls will fall apart during the chocolate coating process.
When melting chocolate, resist the urge to rush with high heat settings. Overheated chocolate becomes grainy and difficult to work with. Patience during the melting process ensures smooth, professional-looking results.
Storing Tips for the Recipe
Store finished Oreo balls in airtight containers in the refrigerator for up to one week. Layer them between parchment paper to prevent sticking, and allow them to come to room temperature for about 10 minutes before serving for the best texture and flavor.
For longer storage, freeze the coated balls for up to three months. Wrap them carefully in freezer-safe containers and thaw gradually in the refrigerator. The texture remains remarkably similar to fresh-made versions.
Uncoated balls can be stored in the refrigerator for up to five days, making them perfect for coating fresh when needed. This approach ensures the chocolate coating maintains its glossy appearance.
Conclusion
These 4-ingredient Oreo balls prove that the most impressive desserts often come from the simplest ingredients. With minimal effort and maximum reward, you'll create treats that look and taste like they required hours of work. The combination of familiar Oreo flavors with creamy, indulgent texture makes them universally appealing.
Whether you're a beginner baker or an experienced cook looking for a quick win, this recipe delivers consistent, crowd-pleasing results every time. Give them a try for your next gathering, and watch as they disappear faster than you can make them – you might want to double the batch!
FAQs
Can I use different cookie varieties instead of Oreos?
Absolutely! Golden Oreos, chocolate chip cookies, or even graham crackers work wonderfully. Adjust the cream cheese quantity slightly based on how the mixture holds together.
Why are my Oreo balls falling apart during coating?
This usually means they weren't chilled long enough or the chocolate is too hot. Ensure balls are thoroughly chilled and let melted chocolate cool slightly before dipping.
Can I make these without a food processor?
Yes, place cookies in a sealed plastic bag and crush with a rolling pin. It takes more effort but achieves similar results. Aim for fine, even crumbs.
How do I fix chocolate that becomes too thick for dipping?
Add a teaspoon of coconut oil or shortening and microwave for 15-20 seconds. Stir until smooth and the right consistency for coating.
Can I add flavoring to the mixture?
Certainly! Try vanilla extract, peppermint extract, or even a tablespoon of peanut butter for flavor variations. Start with small amounts and adjust to taste.
What's the best way to gift these Oreo balls?
Package them in decorative tins or boxes lined with parchment paper. Keep them refrigerated until shortly before giving, and include storage instructions for the recipient.