Introduction
Growing up in my grandmother’s kitchen, the aroma of a bubbling chicken gravy skillet was pure magic. This one-pan wonder transforms simple ingredients into a soul-warming meal that brings families together around the dinner table. A chicken gravy skillet combines tender chicken pieces with a rich, creamy gravy that’s perfect for spooning over mashed potatoes, rice, or fresh biscuits.
What makes this dish truly special is its incredible versatility and comfort factor. The beauty of a well-made chicken gravy skillet lies in its ability to transform basic pantry staples into something extraordinary. The chicken becomes fork-tender while simmering in its own savory gravy, creating layers of flavor that develop beautifully in just one pan. This recipe has been a weeknight lifesaver in my kitchen for years, and I’m excited to share all the tips and tricks that make it foolproof every time.
Ingredients List
Base Ingredients:
- 2 pounds boneless, skinless chicken thighs or breasts, cut into bite-sized pieces
- 3 tablespoons all-purpose flour (divided)
- 3 tablespoons vegetable oil or butter
- 1 large yellow onion, diced
- 3 cloves garlic, minced
- 2 cups chicken broth (low-sodium preferred)
- 1 cup whole milk or heavy cream
Seasonings & Flavor Enhancers:
- 1 teaspoon dried thyme
- 1 teaspoon dried sage
- 1/2 teaspoon black pepper
- 1 teaspoon salt (adjust to taste)
- 1/2 teaspoon paprika
- 2 bay leaves
Optional Garnishes:
- Fresh parsley, chopped
- Green onions, sliced
- A dash of hot sauce
Smart Substitutions:
For gluten-free needs, swap all-purpose flour with cornstarch or gluten-free flour blend. Coconut milk makes an excellent dairy-free alternative to cream, while mushroom broth can replace chicken broth for vegetarian versions. If you prefer white meat, chicken breasts work wonderfully, though thighs provide richer flavor and stay more tender during cooking.
Timing
Preparation Time: 15 minutes
Cooking Time: 25-30 minutes
Total Time: 40-45 minutes
This recipe moves at a comfortable pace, giving you time to prep side dishes while the skillet simmers. The active cooking time is minimal once everything comes together, making it perfect for busy weeknights. For efficient meal planning, you can cut the chicken and dice the onions up to a day ahead. The flour can be mixed with seasonings and stored in a small bowl, ready to go when dinner time arrives.
If you’re serving this for Sunday dinner, start your sides first since the skillet comes together quickly once you begin cooking. The gravy actually improves with a few minutes of resting time, so don’t worry if your mashed potatoes need an extra few minutes in the oven.
How to Make It
1. Prepare the Chicken
Season the chicken pieces generously with salt, pepper, and paprika. Lightly dust with 1 tablespoon of flour, tossing to coat evenly. This creates a beautiful golden crust and helps thicken the gravy later. Let the chicken rest for 5 minutes while you heat your skillet – this allows the seasoning to penetrate the meat.
2. Sear the Chicken
Heat oil in a large cast-iron or heavy-bottom skillet over medium-high heat. Once shimmering, add the chicken pieces in a single layer. Resist the urge to move them around – let them develop a gorgeous golden crust for 4-5 minutes before flipping. Cook until golden on all sides, about 8 minutes total. The chicken doesn’t need to be fully cooked through at this stage.
3. Build the Flavor Base
Remove chicken to a plate and reduce heat to medium. In the same skillet with all those beautiful browned bits, add diced onion. Sauté until translucent and fragrant, about 4 minutes. Add minced garlic and cook for another 30 seconds until aromatic. These fond bits from the chicken are flavor gold – scrape them up as the onions cook.
4. Create the Roux
Sprinkle the remaining 2 tablespoons of flour over the onions and garlic. Stir constantly for 1-2 minutes, creating a light roux. This step is crucial for a smooth, lump-free gravy. The mixture should smell nutty and toasty, not raw or floury.
5. Add Liquids and Seasonings
Gradually pour in the chicken broth while whisking constantly to prevent lumps. Add thyme, sage, and bay leaves. Bring the mixture to a gentle simmer, stirring frequently. The gravy should begin to thicken within 2-3 minutes. If it seems too thick, add a splash more broth; if too thin, let it simmer a bit longer.
6. Finish and Simmer
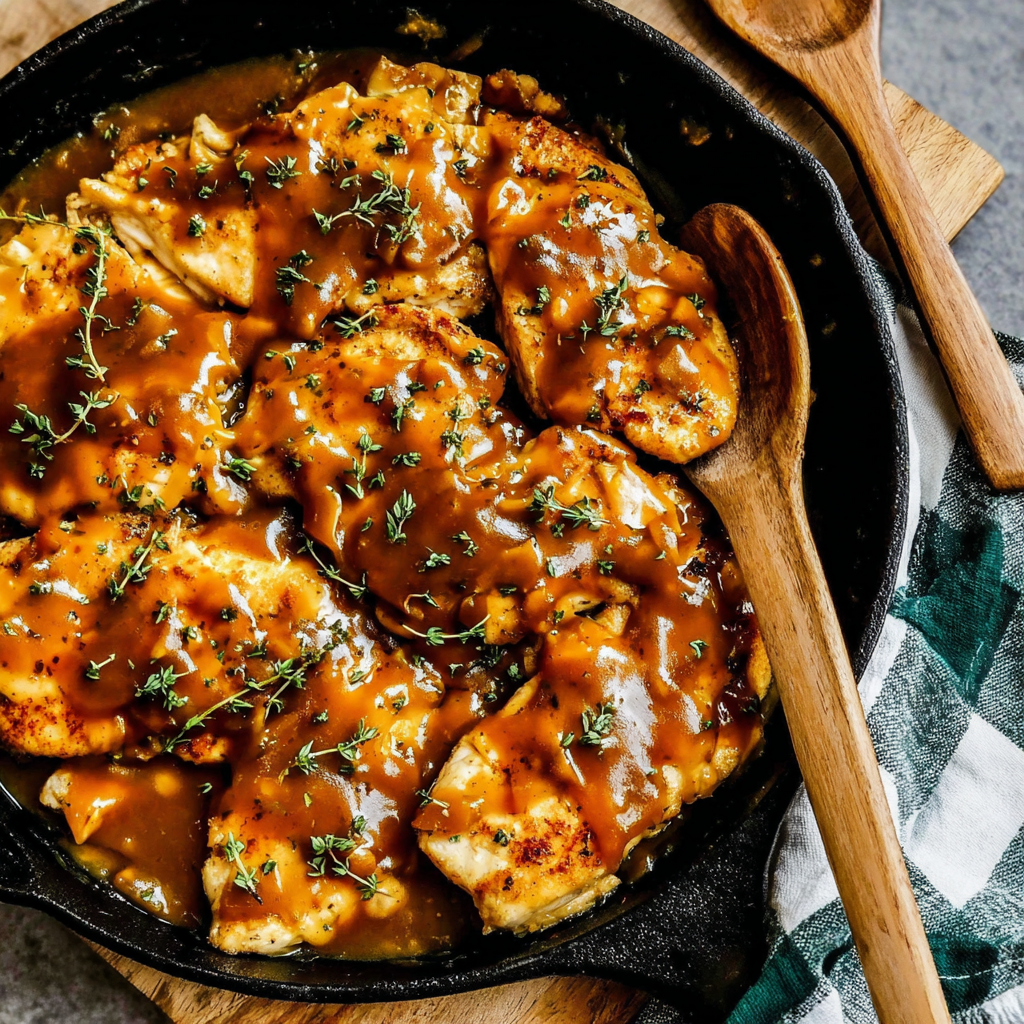
Return the seared chicken to the skillet, nestling pieces into the gravy. Pour in the milk or cream, stirring gently to combine. Reduce heat to low and simmer for 12-15 minutes until the chicken is fully cooked and the flavors have melded beautifully. Taste and adjust seasoning as needed.
Nutritional Information
Each serving of this chicken gravy skillet provides approximately 320 calories, with a good balance of protein, healthy fats, and moderate carbohydrates. The chicken delivers high-quality complete protein essential for muscle maintenance and satiety, while the herbs provide antioxidants and anti-inflammatory compounds.
Using chicken thighs adds beneficial minerals like iron and zinc, plus B-vitamins that support energy metabolism. The moderate fat content from the cooking oil and dairy helps with nutrient absorption and creates that satisfying, stick-to-your-ribs feeling.
This dish is naturally low in carbohydrates, making it suitable for various dietary approaches. The gravy provides calcium from the dairy component, while the onions and garlic contribute prebiotic fiber that supports digestive health. Nutritional values may vary based on specific ingredients and portion sizes used.
Healthier Alternatives for the Recipe
Transform this comfort food into a lighter option by using skinless chicken breast and substituting Greek yogurt for half the cream. This reduces calories while boosting protein content significantly. For a dairy-free version, coconut milk creates an equally creamy texture with a subtle tropical note.
Create a gluten-free adaptation using arrowroot powder or cornstarch instead of wheat flour. These alternatives thicken beautifully and create a glossy, appealing gravy. Reduce sodium by using low-sodium broth and adding extra herbs and spices for flavor depth.
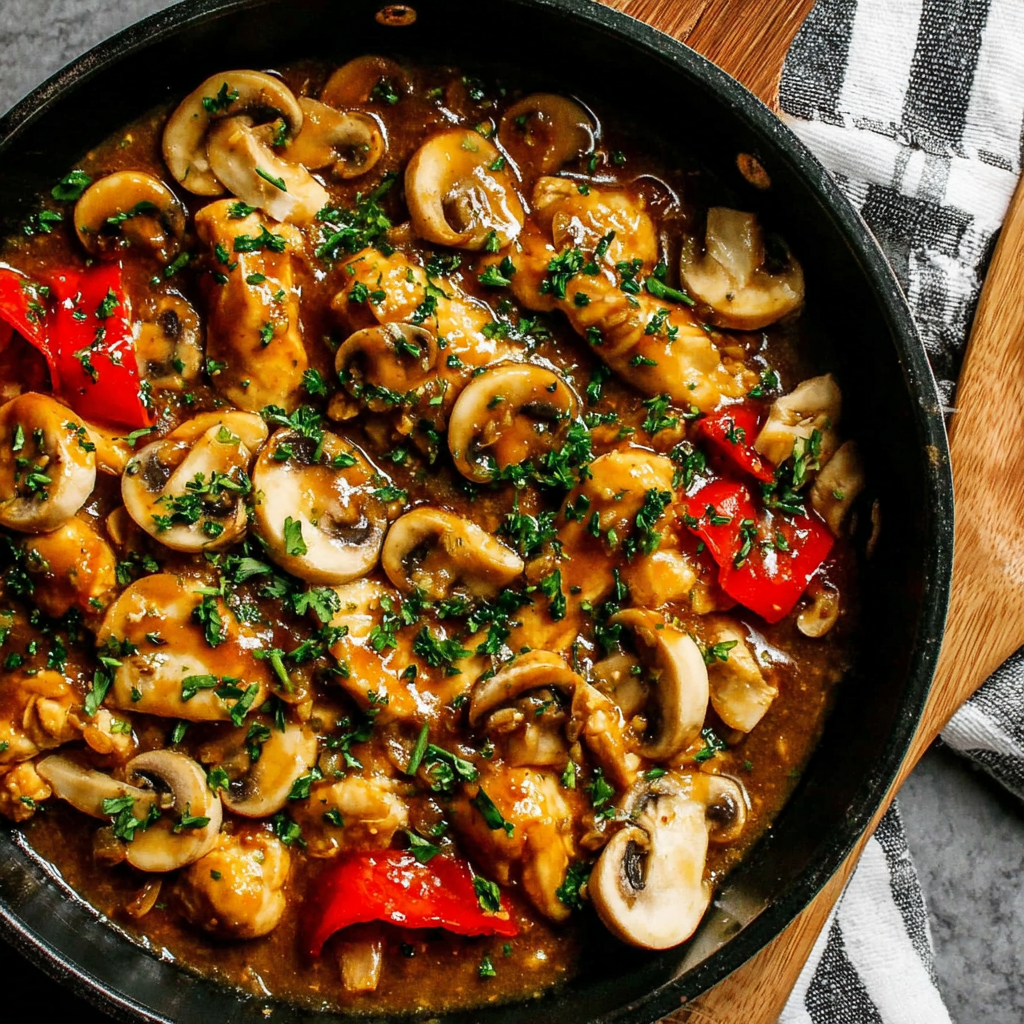
For those watching fat intake, try using cooking spray instead of oil and increase the vegetables by adding mushrooms, carrots, or celery. These additions boost fiber and nutrients while maintaining the hearty, satisfying nature of the dish.
Serving Suggestions
This versatile chicken gravy skillet shines when served over fluffy mashed potatoes, but don’t stop there. Try it over buttery egg noodles, creamy polenta, or wild rice pilaf for delicious variations. Fresh biscuits are perfect for sopping up every drop of that incredible gravy.
For a complete meal, pair with roasted vegetables like green beans, Brussels sprouts, or honey-glazed carrots. A simple side salad with vinaigrette provides a fresh contrast to the rich gravy. During cooler months, serve alongside cornbread and sautéed greens for ultimate comfort food satisfaction.
Consider presentation by garnishing with fresh herbs, a sprinkle of paprika, or a dollop of sour cream. Individual cast-iron skillets make impressive dinner party presentations, while family-style serving encourages everyone to gather around the table.
Common Mistakes to Avoid
The biggest mistake is rushing the browning process. Properly seared chicken creates the foundation of flavor, so resist moving the pieces too early. Soggy, pale chicken leads to bland gravy, so be patient with this crucial step.
Another common issue is adding liquid too quickly when making the roux. Pour gradually while whisking constantly to prevent lumps. If lumps do form, strain the gravy through a fine-mesh sieve or blend briefly with an immersion blender.
Overcooking the chicken results in tough, dry meat. Since chicken continues cooking in the simmering gravy, remember it doesn’t need to be fully cooked during the initial searing. Using a meat thermometer ensures perfect doneness – aim for 165°F internal temperature.
Finally, don’t forget to taste and adjust seasoning at the end. Gravy often needs more salt or pepper than you might expect, and fresh herbs brighten the entire dish.
Storing Tips for the Recipe
Store leftover chicken gravy skillet in the refrigerator for up to 3 days in airtight containers. The flavors actually improve overnight, making this an excellent make-ahead option for meal prep or entertaining.
For freezing, cool completely before transferring to freezer-safe containers, leaving some headspace for expansion. Freeze for up to 3 months, though the texture may change slightly upon thawing. Dairy-based gravies sometimes separate when frozen, but gentle reheating while stirring usually brings them back together.
When reheating, do so gently over low heat, stirring frequently. Add a splash of broth or milk if the gravy has thickened too much during storage. Microwave reheating works for individual portions – use 30-second intervals, stirring between each to ensure even heating.
For make-ahead preparation, you can brown the chicken and prepare the vegetables up to a day in advance. Store separately and combine when ready to finish cooking.
Conclusion
This chicken gravy skillet represents everything wonderful about comfort cooking – simple ingredients transformed into something truly special through proper technique and patience. The combination of golden-brown chicken swimming in rich, savory gravy creates a meal that satisfies both body and soul.
Whether you’re cooking for a busy weeknight dinner or Sunday family gathering, this recipe delivers consistent, delicious results every time. The beauty lies in its adaptability – make it your own with different seasonings, vegetables, or serving styles.
I encourage you to try this recipe and make it part of your regular dinner rotation. Don’t be afraid to experiment with the seasonings or add your favorite vegetables. Share your own variations and family traditions – food always tastes better when it brings people together.
FAQs
Can I use chicken breasts instead of thighs?
Absolutely! Chicken breasts work wonderfully in this recipe. Cut them into uniform pieces and be careful not to overcook, as breast meat can become dry more quickly than thighs. The cooking time might be slightly less, so check for doneness around the 10-minute mark.
How can I make the gravy thicker or thinner?
For thicker gravy, simmer uncovered for a few extra minutes or whisk in a slurry made from 1 tablespoon cornstarch mixed with 2 tablespoons cold water. For thinner consistency, gradually add more broth or milk until you reach the desired texture.
Can this recipe be made in advance?
Yes! This dish actually tastes better the next day as flavors have time to meld. Prepare completely, cool, and refrigerate. Reheat gently over low heat, adding liquid if needed. You can also prep components separately and assemble when ready to cook.
What’s the best way to prevent lumpy gravy?
The key is gradual liquid addition while whisking constantly when making the roux. Keep your whisk moving and add broth slowly. If lumps do form, strain the gravy or use an immersion blender to smooth it out.
Can I add vegetables to this skillet?
Definitely! Mushrooms, peas, carrots, and celery all work beautifully. Add heartier vegetables like carrots with the onions, while delicate ones like peas should go in during the last few minutes of cooking.
How do I know when the chicken is properly cooked?
Use a meat thermometer to check that the internal temperature reaches 165°F. The chicken should be opaque throughout with no pink areas, and juices should run clear when pierced with a fork.