Introduction
Nothing says comfort food quite like a tender, melt-in-your-mouth pot roast recipe that fills your entire home with the most incredible aroma. This classic pot roast recipe transforms an affordable cut of beef into something absolutely magical – the kind of dinner that brings families together around the table and creates memories that last a lifetime.
What makes this pot roast recipe truly special is how the tough chuck roast slowly breaks down during cooking, absorbing all those rich flavors from herbs, vegetables, and savory broth. The result is fork-tender meat that practically falls apart, surrounded by perfectly cooked vegetables in a luscious, deeply flavored gravy that’s pure liquid gold.
This isn’t just dinner – it’s a warm hug on a plate that requires minimal hands-on time while delivering maximum satisfaction. Whether you’re feeding a hungry family or meal prepping for the week ahead, this foolproof pot roast recipe will become your go-to comfort meal.
Ingredients List
For the Roast:
- 3-4 pounds chuck roast, well-marbled with fat
- 2 tablespoons olive oil or vegetable oil
- 2 teaspoons kosher salt
- 1 teaspoon freshly ground black pepper
- 2 tablespoons all-purpose flour
For the Vegetables:
- 1 large yellow onion, cut into thick wedges
- 4 medium carrots, cut into 2-inch chunks
- 1 pound baby potatoes, halved (or regular potatoes, chunked)
- 4 celery stalks, cut into 2-inch pieces
- 6 garlic cloves, smashed
For the Braising Liquid:
- 2 cups beef broth (low-sodium preferred)
- 1 cup red wine (or additional beef broth)
- 2 tablespoons tomato paste
- 2 bay leaves
- 3 fresh thyme sprigs
- 2 fresh rosemary sprigs
Substitution Notes: Can’t find chuck roast? Beef shoulder or bottom round work beautifully. For gluten-free cooking, skip the flour coating. Vegetarians can create a hearty mushroom version using large portobello caps and vegetable broth.
Timing
Total Time: 4 hours 15 minutes
Prep Time: 20 minutes
Cook Time: 3 hours 45 minutes
Rest Time: 10 minutes
Time Management Tips: Start this pot roast recipe in the early afternoon for a perfect dinner timing. While the roast sears, prep your vegetables. During the long braising time, you can tackle other tasks – just check occasionally. Make this entirely ahead and reheat the next day for even deeper flavors.
How to Make It
1. Prepare the Chuck Roast
Pat the chuck roast completely dry with paper towels – this step is crucial for proper browning. Season generously with salt and pepper, then lightly dust with flour, shaking off any excess. Let the seasoned roast sit at room temperature for 15 minutes while you prep other ingredients.
2. Sear for Maximum Flavor
Heat oil in a heavy Dutch oven or large oven-safe pot over medium-high heat until shimmering. Carefully place the roast in the hot oil and sear without moving for 4-5 minutes until a deep golden crust forms. Flip and sear the other side, then brown all edges. This creates incredible depth of flavor that infuses the entire dish.
3. Build the Flavor Base
Remove the seared roast and set aside. In the same pot with all those beautiful browned bits, add onions and cook for 3-4 minutes until softened. Stir in tomato paste and cook for another minute until fragrant. Pour in wine (if using) and scrape up all those golden bits from the bottom – that’s pure flavor gold.
4. Create the Braising Environment
Return the roast to the pot and add beef broth until the liquid comes about halfway up the sides of the meat. Nestle in the herb sprigs and bay leaves. The liquid should gently bubble, not vigorously boil. Cover tightly with a lid.
5. Low and Slow Braising
Transfer to a preheated 325°F oven and braise for 2 hours. The low temperature ensures the tough connective tissues break down slowly, creating that signature tender texture. Resist the urge to peek too often – every time you lift the lid, you lose heat and moisture.
6. Add the Vegetables
Carefully remove the pot from the oven and add carrots, potatoes, celery, and garlic around the roast. The vegetables will finish cooking in the flavorful braising liquid, absorbing all those incredible flavors while maintaining their texture.
7. Finish and Rest
Continue braising for another 1-1.5 hours until the meat easily shreds with a fork and vegetables are tender. Remove from oven and let rest for 10 minutes before serving – this allows juices to redistribute throughout the meat.
Nutritional Information
One generous serving of this pot roast recipe provides approximately 450-500 calories, with about 35-40 grams of high-quality protein. Chuck roast is rich in iron, zinc, and B-vitamins, particularly B12, which supports energy metabolism. The vegetables add fiber, potassium, and various antioxidants.
The slow cooking method helps break down tough proteins while retaining nutrients. This complete meal offers a good balance of protein, complex carbohydrates from the vegetables, and essential minerals. The braising liquid reduces sodium needs since the long cooking process concentrates natural flavors.
Remember that nutritional values can vary based on specific ingredients used and portion sizes. The vegetables significantly boost the nutritional profile while keeping calories reasonable for such a satisfying meal.
Healthier Alternatives for the Recipe
Lower Calorie Version: Trim visible fat from the roast before cooking and skim the braising liquid during cooking. Use more vegetables and smaller meat portions to maintain satisfaction while reducing calories.
Reduced Sodium: Choose low-sodium broth and limit added salt, relying instead on herbs, garlic, and wine for flavor development. The long cooking time naturally concentrates flavors without needing excessive salt.
Gluten-Free Adaptation: Simply skip the flour dusting step – the roast will still develop a beautiful crust and the braising liquid will thicken naturally from the vegetables and reduced cooking liquids.
Lower Carb Option: Replace potatoes with turnips, radishes, or extra carrots. These vegetables become incredibly tender and absorb flavors beautifully while reducing overall carbohydrate content.
Serving Suggestions
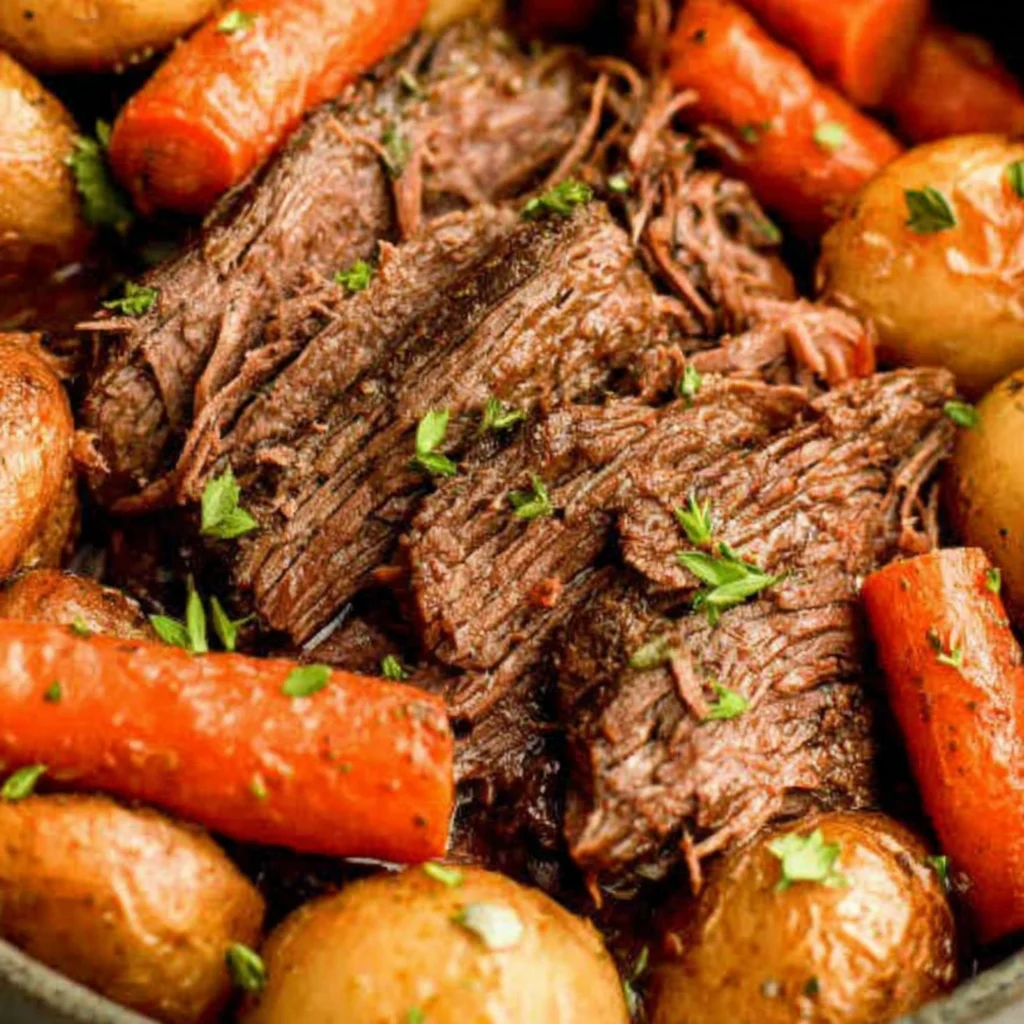
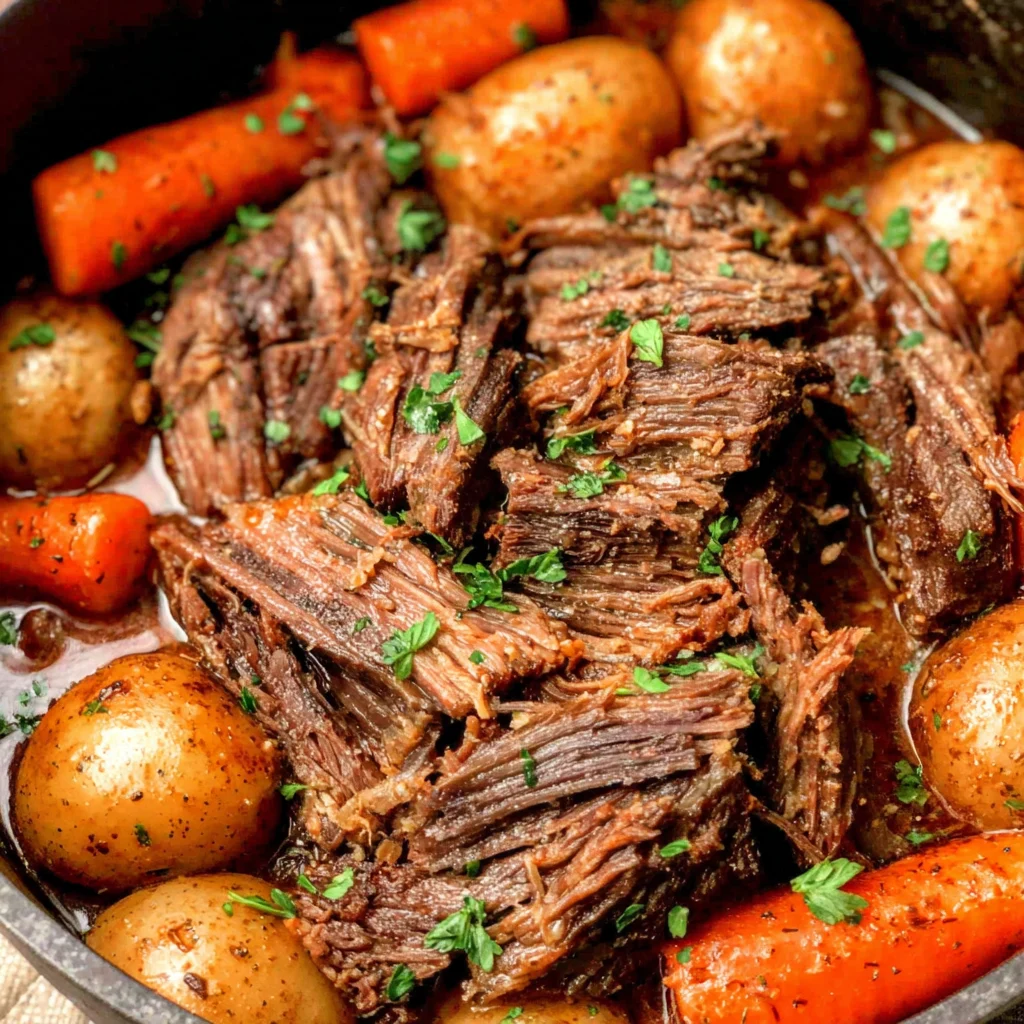
Serve this pot roast recipe family-style, sliced against the grain with vegetables spooned around the platter. The natural braising liquid makes an incredible gravy – just strain it if you prefer it smooth.
Classic accompaniments include crusty bread for soaking up those delicious juices, creamy mashed cauliflower, or simple egg noodles. A crisp green salad with vinaigrette provides a bright contrast to the rich, savory flavors.
For special occasions, garnish with fresh chopped parsley and serve with roasted Brussels sprouts or green beans. The leftovers make incredible sandwiches or can be transformed into a hearty pot roast hash for breakfast.
Plan on about 6-8 ounces of meat per person, plus vegetables. This recipe easily feeds 6-8 people generously.
Common Mistakes to Avoid
Skipping the Searing: That initial browning creates layers of flavor that can’t be replicated any other way. Don’t rush this crucial step, even if it seems time-consuming.
Cooking Too Hot: High temperatures make the meat tough and stringy. Low and slow is the only way to achieve that perfect fall-apart texture that makes pot roast legendary.
Adding Vegetables Too Early: Root vegetables can become mushy if added from the beginning. Adding them partway through ensures they’re tender but maintain some structure.
Not Resting the Meat: Let that roast rest before slicing. This allows the juices to redistribute, ensuring every bite is moist and flavorful rather than dry.
Cutting With the Grain: Always slice against the grain for maximum tenderness, even with perfectly cooked pot roast.
Storing Tips for the Recipe
Refrigerator Storage: Cool completely before storing in airtight containers for up to 4 days. The flavors actually improve overnight, making leftovers even more delicious than the original meal.
Freezer Storage: Portion into freezer-safe containers with some braising liquid to prevent drying. Freeze for up to 3 months. The vegetables may become softer after freezing but still taste excellent.
Reheating Instructions: Reheat gently in a covered pot with a splash of broth to prevent drying. Low heat prevents the meat from becoming tough. Microwave individual portions with a damp paper towel cover.
Make-Ahead Tips: This pot roast recipe can be completely prepared a day ahead and reheated. Many cooks swear the flavors are even better the next day.
Conclusion
This pot roast recipe represents everything wonderful about home cooking – simple ingredients transformed into something extraordinary through patience and care. The beauty lies not just in the incredible flavors, but in how effortless it becomes once you understand the technique.
What makes this recipe truly special is its forgiving nature and spectacular results. Whether you’re new to braising or a seasoned cook, this pot roast delivers consistent, impressive results that will have everyone asking for seconds.
Give this comforting pot roast recipe a try this weekend, and experience how something so simple can create such lasting food memories. Don’t forget to share your results – I’d love to hear about any creative variations you discover!
FAQs
Can I make this pot roast recipe in a slow cooker?
Absolutely! Sear the meat first in a skillet, then transfer everything to your slow cooker. Cook on low for 6-8 hours, adding vegetables during the last 2-3 hours.
What if my roast turns out tough?
Tough pot roast usually means it needs more cooking time. Return it to the oven and continue braising until it easily shreds with a fork. Every roast is different, so cooking times can vary.
Can I substitute the red wine?
Yes! Use additional beef broth, or try grape juice mixed with a tablespoon of vinegar for similar acidity. The wine adds depth but isn’t absolutely essential.
Why is my braising liquid too thin?
Remove the roast and vegetables, then simmer the liquid on the stovetop to reduce and concentrate flavors. You can also whisk in a flour slurry (flour mixed with cold water) to thicken.
How do I know when the pot roast is done?
The meat should easily shred when tested with a fork, and an instant-read thermometer should read at least 195°F in the thickest part. At this temperature, the connective tissues have fully broken down.
Can I add other vegetables?
Definitely! Mushrooms, parsnips, or sweet potatoes work wonderfully. Just consider their cooking times and add accordingly – harder vegetables go in earlier, delicate ones later.